Bringing Dell G15 Fan Control to Linux: Investigating `alienware_wmi` and Building a GNOME Extension
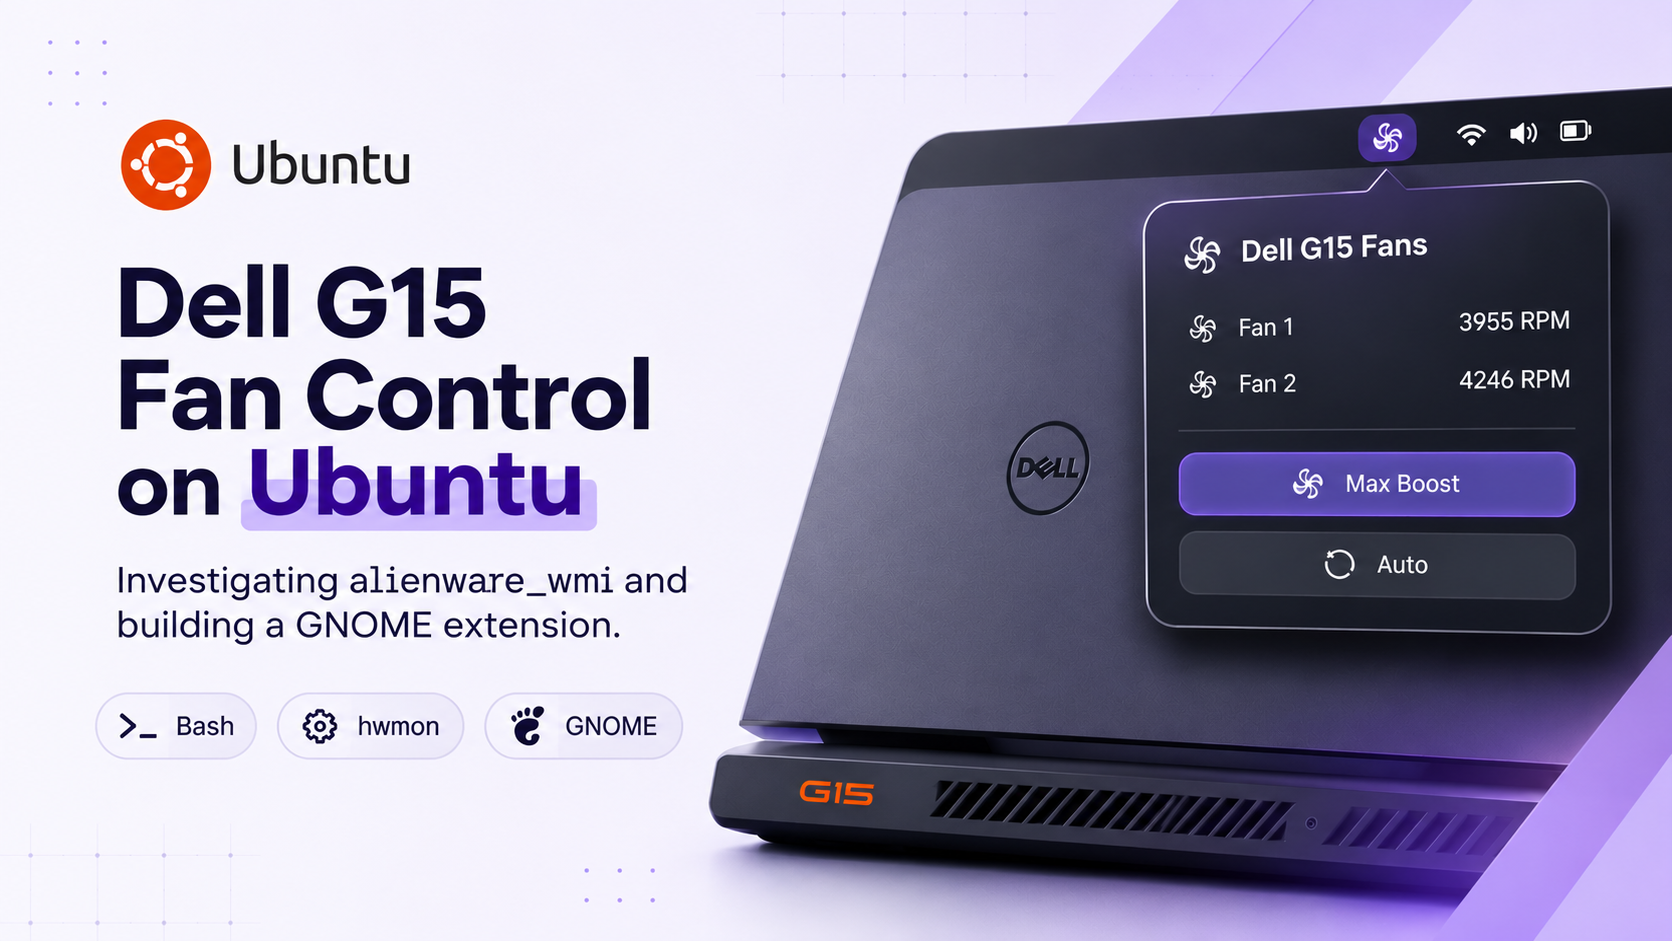
Gaming laptops have sophisticated thermal management systems. However, having access to the hardware does not always mean having convenient access to its controls.
The Dell G15 includes a dedicated G-mode key (F9) that activates rapid cooling in supported Windows configurations. When using Ubuntu on my Dell G15 5520, I wanted a similar way to monitor fan speeds, request maximum fan boost, and restore automatic fan operation.
The challenge was that Linux did not provide an equivalent convenient workflow in my tested setup.
Rather than attempting to recreate Dell's entire Windows thermal-management software, I decided to investigate the hardware interfaces already exposed by the Linux kernel.
The result was Dell G15 Fan Control, a Linux utility with three components:
- A command-line interface for monitoring and controlling the fans.
- A privileged helper for hardware operations.
- A GNOME Shell extension for desktop integration.
This article documents the investigation, implementation, and testing process.
1. Investigating the Hardware
Before writing any code, I needed to understand how Linux exposed the laptop's fan controls.
Linux provides a hardware monitoring subsystem called hwmon. Drivers that support hardware monitoring expose their attributes through:
ls /sys/class/hwmon/
My system returned:
hwmon0  hwmon1  hwmon2  hwmon3  hwmon4
hwmon5  hwmon6  hwmon7  hwmon8
The device numbers alone were not particularly useful. I needed to identify which hardware component each directory represented.
I used:
for hwmon in /sys/class/hwmon/hwmon*; do
    echo "$(basename "$hwmon"): $(cat "$hwmon/name")"
done
The output from my Dell G15 5520 was:
hwmon0: AC
hwmon1: BAT0
hwmon2: nvme
hwmon3: ucsi_source_psy_USBC000:001
hwmon4: alienware_wmi
hwmon5: dell_ddv
hwmon6: dell_smm
hwmon7: iwlwifi_1
hwmon8: coretemp
The important discovery was alienware_wmi.
This indicated that the Linux kernel had registered an Alienware WMI hardware monitoring interface on the laptop.
The other interfaces exposed information for components such as the battery, NVMe storage, wireless adapter, and CPU temperatures.
For this project, alienware_wmi was the interface worth investigating further.
2. Exploring the alienware_wmi Interface
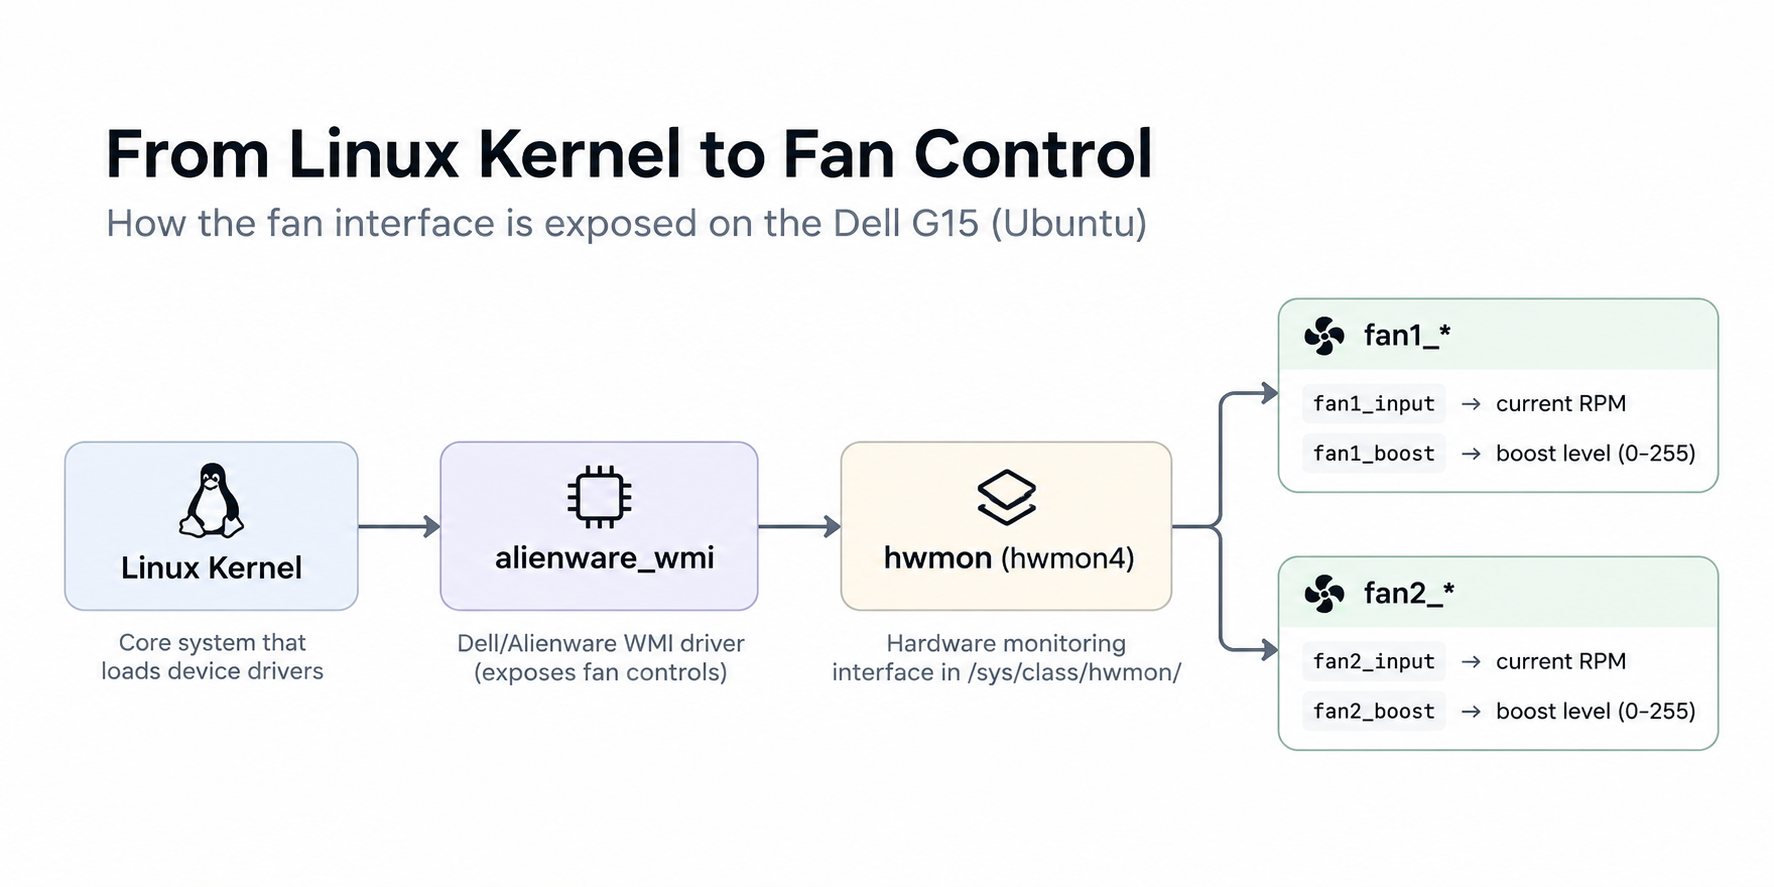
After identifying the relevant device, I inspected its contents:
ls -l /sys/class/hwmon/hwmon4/
The directory contained several fan-related attributes:
fan1_boost
fan1_input
fan1_label
fan1_max
fan1_min

fan2_boost
fan2_input
fan2_label
fan2_max
fan2_min
There were also temperature-related attributes and additional hardware monitoring information.
The four attributes that mattered most were:
| Attribute | Purpose |
|---|---|
fan1_input |
Fan 1 speed |
fan2_input |
Fan 2 speed |
fan1_boost |
Fan 1 boost control |
fan2_boost |
Fan 2 boost control |
This was the key finding.
The kernel driver exposed both fan speed readings and writable boost controls. I could therefore build the application around an existing kernel interface instead of creating a separate hardware communication layer.
Why Not Hardcode hwmon4?
Linux assigns hwmon device numbers dynamically. Although alienware_wmi appeared as hwmon4 on my machine, this number could change depending on device registration order.
A utility that assumes the interface will always exist at:
/sys/class/hwmon/hwmon4/
would be unnecessarily fragile.
The implementation therefore searches the available hwmon directories and identifies the device using its name attribute.
This allows the utility to locate alienware_wmi even when its assigned hwmon number changes.
3. Understanding Fan Boost Controls
Finding the boost attributes was only the first step. I also needed to understand their behaviour.
The driver exposed two writable attributes:
fan1_boost
fan2_boost
The implementation uses two values:
| Value | Operation |
|---|---|
0 |
Automatic fan operation |
255 |
Maximum fan boost request |
To request maximum boost on my current system:
echo 255 | sudo tee /sys/class/hwmon/hwmon4/fan1_boost
echo 255 | sudo tee /sys/class/hwmon/hwmon4/fan2_boost
To restore automatic operation:
echo 0 | sudo tee /sys/class/hwmon/hwmon4/fan1_boost
echo 0 | sudo tee /sys/class/hwmon/hwmon4/fan2_boost
Fan speeds can be read independently:
cat /sys/class/hwmon/hwmon4/fan1_input
cat /sys/class/hwmon/hwmon4/fan2_input
These values are reported in RPM.
Important: These commands use hwmon4 because that was the interface number on my tested system. The project itself discovers the interface dynamically.
A Note About the Control Mechanism
It is important to distinguish a fan boost request from direct fan-speed control.
Writing 255 requests maximum boost through the driver. It does not specify an exact RPM target or implement a custom fan curve.
The actual fan speed remains subject to firmware and hardware behaviour.
Similarly, restoring 0 returns fan management to automatic firmware-controlled operation.
4. Building the Command-Line Utility
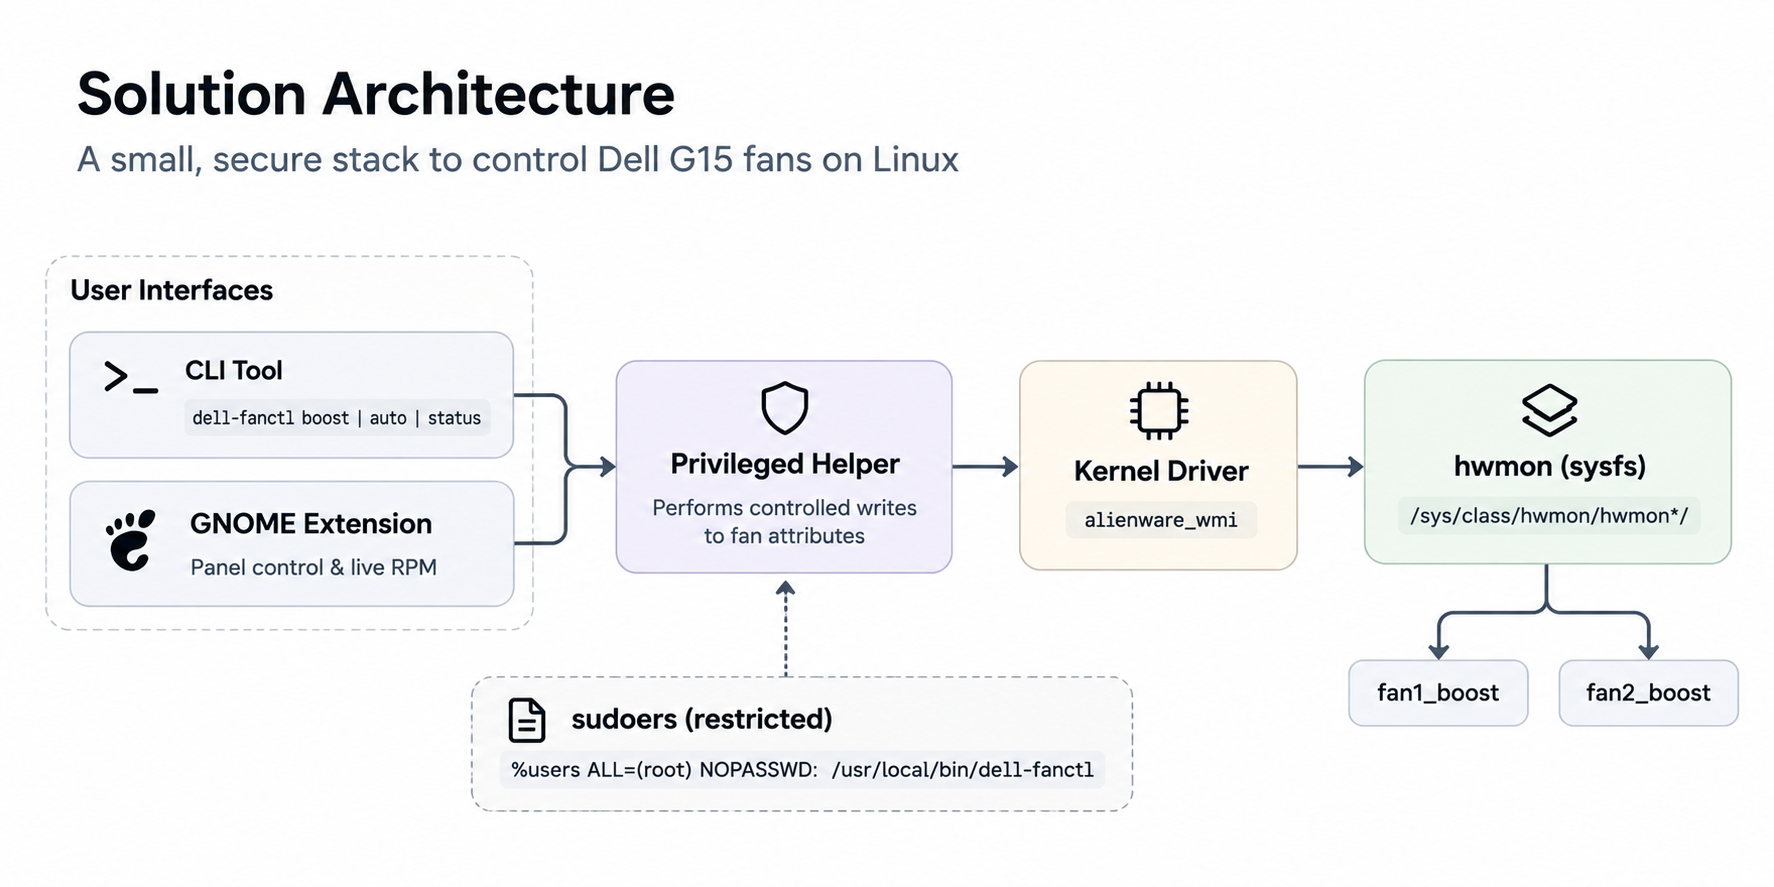
Once I understood the hardware interface, I wanted to avoid manually reading and writing sysfs attributes every time.
I implemented a Bash-based command-line utility named dell-fanctl.
The utility supports four commands:
dell-fanctl status
dell-fanctl boost
dell-fanctl auto
dell-fanctl help
4.1 Status Monitoring
The status command reads the available hardware attributes and displays the current state.
dell-fanctl status
Example output:
Dell Fan Control
-------------------------
Driver:       alienware_wmi
Interface:    hwmon4
Fan 1:        3955 RPM
Fan 2:        4246 RPM
Fan 1 boost:  255
Fan 2 boost:  255
Mode:         Maximum boost
The displayed RPM values are illustrative. Actual readings vary with workload, temperature, and firmware behaviour.
The utility determines the operating mode by examining both boost values:
- Both values are
0: Automatic. - Both values are
255: Maximum boost. - Different values: Mixed or custom state.
4.2 Maximum Boost
dell-fanctl boost
This invokes the privileged helper to request maximum boost for both fans.
4.3 Automatic Mode
dell-fanctl auto
This restores automatic fan operation.
4.4 Dynamic Hardware Discovery
The CLI does not rely on a hardcoded hwmon number.
Instead, it iterates through:
/sys/class/hwmon/hwmon*
and checks each device's name attribute.
Once it finds alienware_wmi, it uses that directory to read fan speeds and boost values.
This makes the implementation more robust across reboots and changes in device registration order.
5. Separating Hardware Access from the CLI
The next problem was permissions.
Reading the fan attributes does not require the same privileges as writing to them. Hardware-control operations require elevated permissions.
Running the entire application as root would have been unnecessary.
I therefore separated the application into two scripts:
scripts/
├── fanctl
└── fanctl-write
| Component | Responsibility |
|---|---|
fanctl |
User-facing commands and hardware status |
fanctl-write |
Privileged fan-control operations |
The privileged helper accepts only two operations:
fanctl-write boost
fanctl-write auto
It maps those operations to the corresponding boost values.
It also validates the hardware attributes before attempting writes. If the second fan operation fails after the first succeeds, it attempts to restore the previous value of the first fan.
This provides a basic rollback mechanism for partial failures.
5.1 Avoiding Repeated Password Prompts
A fan-control utility would be inconvenient if every button press required a password.
I used a dedicated sudoers configuration to permit only the two supported helper operations without a password.
The rule is restricted to the installed helper and its supported arguments.
The configuration is validated using:
sudo visudo -c
This keeps privileged operations separate from the normal CLI and avoids granting unrestricted passwordless root access.
6. Building the GNOME Shell Extension
The command-line interface solved the functional problem, but I wanted fan control to be accessible directly from the desktop.
Since my Ubuntu installation uses GNOME, I built a GNOME Shell extension.
The extension adds a fan indicator to the top panel.
Its interface intentionally contains only the information and controls required for everyday use.
It displays:
- Fan 1 RPM.
- Fan 2 RPM.
- Current operating mode.
It provides two controls:
| Control | Operation |
|---|---|
| Auto | Restores automatic fan operation |
| Max Boost | Requests maximum fan boost |
The extension refreshes fan readings periodically.
Why Use the CLI as the Backend?
Instead of implementing hardware discovery and privileged operations again inside JavaScript, the extension communicates with the existing CLI.
The architecture is:
           GNOME Shell
                |
                v
       GNOME Extension
                |
                v
           dell-fanctl
                |
                v
       Privileged Helper
                |
                v
          alienware_wmi
                |
                v
           Fan Controls
This keeps the hardware-control logic in one place.
The CLI and GNOME extension both use the same backend, reducing duplicated logic and making future maintenance easier.
Wayland and Extension Discovery
During installation, I encountered a GNOME-specific issue.
The extension files could be copied successfully, but GNOME Shell did not always discover the newly installed extension immediately.
On my Wayland session, restarting GNOME Shell through the traditional Alt + F2, followed by r, workflow was not available.
Logging out and logging back in allowed GNOME to discover the extension.
This behaviour was accounted for in the installation guidance.
7. Installation and Uninstallation
Once the backend and desktop integration were functional, I added installation and uninstallation scripts.
The installer handles:
- Hardware compatibility checks.
- CLI installation.
- Privileged helper installation.
- Restricted sudoers configuration.
- GNOME extension installation.
- An attempt to enable the extension.
Installation:
git clone https://github.com/vishalrmahajan/dell-g15-fan-control.git
cd dell-g15-fan-control

chmod +x install.sh
./install.sh
The uninstaller restores automatic fan operation before removing the installed components.
./uninstall.sh
It removes the GNOME extension, CLI, privileged helper, and project-specific sudoers configuration.
The repository source files are preserved.
8. Testing
Testing was performed on the actual Dell G15 5520, in addition to backend tests using mock hardware monitoring directories.
The test suite covers:
- Fan RPM readings.
- Automatic mode.
- Maximum boost mode.
- Mixed fan states.
- Missing hardware driver.
- Missing boost attributes.
- Invalid boost values.
- Missing RPM attributes.
- Dynamic hwmon device discovery.
Run the test suite:
bash tests/test-fanctl.sh
The backend test suite contains ten assertions.
I also tested the privileged writer separately to verify automatic and boost transitions without relying exclusively on the real hardware.
Hardware Observations
During testing, maximum boost produced readings of approximately:
| Fan | Observed speed |
|---|---|
| Fan 1 | 3955 RPM |
| Fan 2 | 4246 RPM |
These are observed values from a test session, not fixed RPM targets.
In automatic mode, fan speeds varied with system conditions. This is expected because the firmware manages fan operation based on thermal requirements.
9. Project Structure
The final project is organized as follows:
dell-g15-fan-control/
├── docs/
│   ├── development-environment.txt
│   └── screenshots/
├── extensions/
│   └── dell-g15-fan-control/
│       ├── extension.js
│       └── metadata.json
├── scripts/
│   ├── fanctl
│   └── fanctl-write
├── tests/
│   └── test-fanctl.sh
├── install.sh
├── uninstall.sh
├── README.md
└── .gitignore
The separation between the backend, desktop integration, and installation scripts keeps the project manageable and makes individual components easier to test.
10. Limitations and Future Work
The current implementation has been tested on the Dell G15 5520 running Ubuntu 26.04.1 LTS with GNOME 50.
There are some limitations:
- Compatibility with other Dell G15 models has not yet been verified.
- The utility depends on the fan-control attributes exposed by
alienware_wmi. - Maximum boost requests the highest boost value exposed by the driver. It does not directly set an RPM target.
- Custom fan curves are not implemented.
- The utility does not replace the laptop's firmware thermal management.
Potential future improvements include testing additional Dell G15 models, improving hardware compatibility detection, and extending desktop integration.
Conclusion
What started as an attempt to access the rapid cooling functionality of my Dell G15 from Ubuntu turned into a small Linux hardware-control project.
The most important part was not writing the fan-control commands. It was understanding the hardware monitoring interface exposed by the kernel, identifying the relevant attributes, and building a practical interface around them.
The project now provides fan monitoring and control through both the terminal and GNOME desktop, while keeping privileged hardware operations isolated in a dedicated helper.
It demonstrates how existing Linux kernel interfaces can be used to build practical hardware utilities without developing an entirely new driver.
Repository: Dell G15 Fan Control
Tested on Dell G15 5520, Ubuntu 26.04.1 LTS, GNOME 50.
Comments
Join the discussionNo comments yet. Be the first to comment.